-Article edited by kc_admin.
Ever since I was in college, I've been a car stereo kind of guy. I was well out of college and on my second job before I could afford exactly what I wanted in a car stereo. In 2000, I bought a new Mazda Millenia S, a dream car of mine in many ways. Within the first week, I took it to my local car stereo store where I had the whole stereo system replaced. MB Quartz speakers, JL Dual 10 inch Subwoofers with custom enclosure, two Rockford Fosgate Punch amps, and a Sony ES 900XRC single din head unit. The system was tuned not for volume, but for clarity and exactness. It was an awesome setup and I kept the car for 16 years. I wore out the volume control on the unit after 12 years and replaced the head with another Sony deck. After driving the car for 289k, the engine started to show its wear and further repair didn’t seem practical. In April of 2016, I bought a new 2017 Mazda 6 hoping that the factory stereo would prove adequate.
It didn't and there I was... I had a great new car, but with a crappy sounding system and clunky interface. What agitated me the most about the interface was there was no way to skip a folder. If I wanted to move around the list, I had to work the knob and watch the screen. Not fun at all.
I knew I would never be happy with the car unless I could get the sound system to sound at least as good as my previous system. I first tried to go the modern method - replace the speakers, add an amplifier, but use the existing head unit. That's done by purchasing a device that takes the amplified signal that goes to the speakers and turns them to line out. These devices also have the capability to change the signal. For example, many modern units reduce the bass output as the volume increases. This is done primarily for two reasons: 1) it takes a lot of power to produce low frequency sounds and the OEM amps just don't have nearly enough power to do that, and 2) the OEM speakers just can't handle a lot of power. In other words, they're junk compared to high quality equipment. Back to the unit, it's able to modify the signal to compensate for the drop in bass.
I tried this route and was completely dissatisfied. The device could not make up for the deficiencies of the factory amp. It also either transmitted or introduced a high pitch whine into the signal. So, I needed to go old school and have a full classic car stereo with a traditional head unit. Since no one makes a replacement head unit for the Mazda 6, I had to go custom. Here's what I mean:
I did a fair bit of research in my local area to find a car stereo shop. I was taken aback by how much this market segment has shrunk since 2000. I suppose since modern cars have significantly integrated the audio system into the navigation and computer system, it has made it very difficult for aftermarket manufacturers to plug in. After visiting a few places, I settled on Capital Stereo in Fremont California.
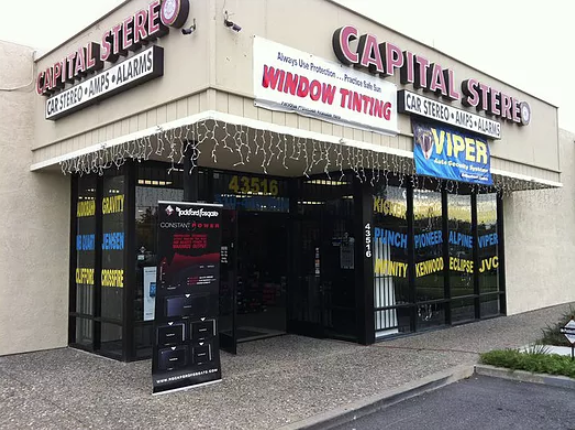
I choose this store because it felt like a traditional car stereo place. They had plenty of inventory and two installers. I pretty much knew what I wanted and Tony (the gentleman that handled my purchase) was able to special order everything I needed. He was very customer focused and I would, without question, return if I ever needed more work performed.
As I mentioned before during the first go around, I attempted to use the existing OEM system as the source. If you’re an audiophile, I don’t recommend that route unless you’re able to get true line out from the source equipment. In my situation, even if I had true line out, the OEM interface was so dysfunctional, I would have eventually gone this route. Therefore, I’m going to skip the first build and discuss the final build only. Here’s the major component parts list:
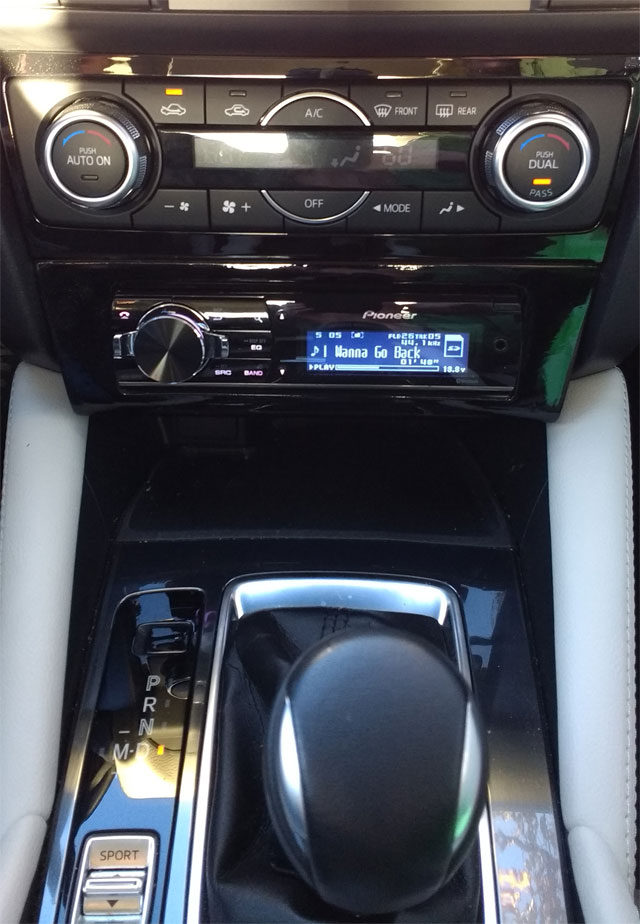
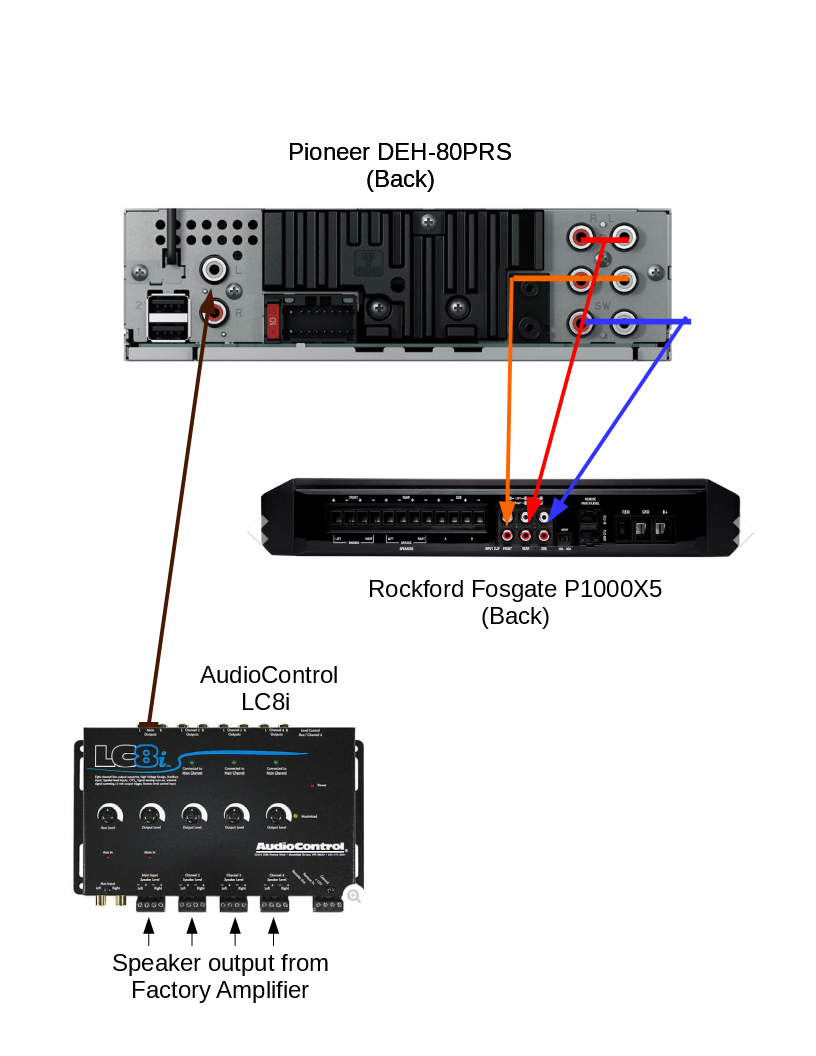
- Pioneer DEH-80PRS Head Unit
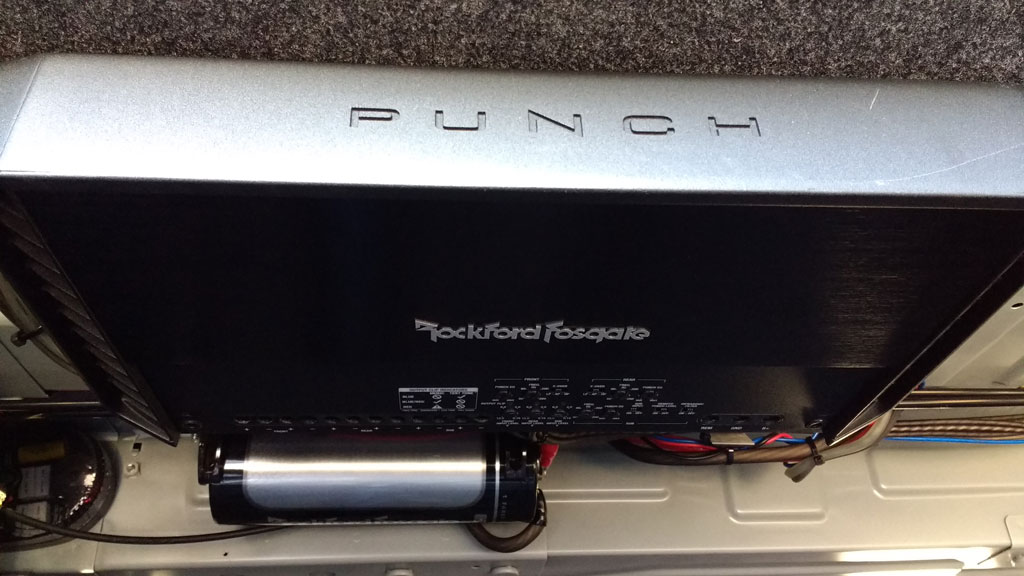
- Rockford Fosgate P1000X5 Amp
- AudioControl LC8i (only needed if you want to connect the factory unit as a source to the Pioneer and was a leftover from the first go around.)
- JL Audio C5-650 2-Way Component Speaker System (2 sets – front and rear.)
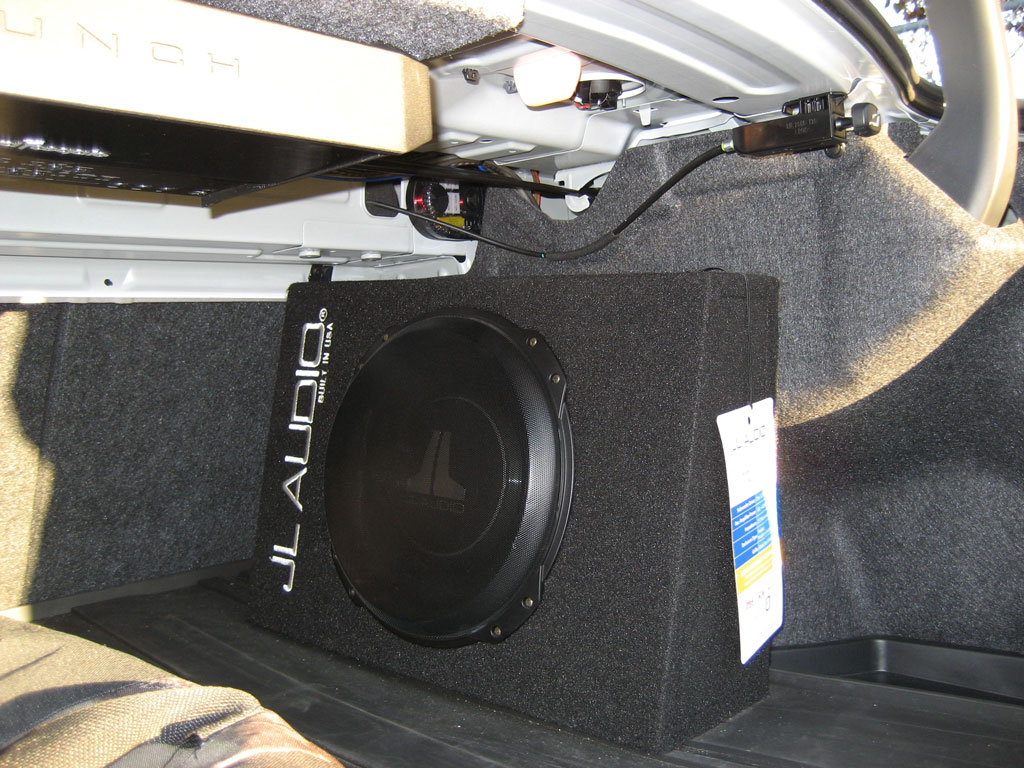
- JL Audio CS110TG-TW3 Truck PowerWedge, Sealed.
Here’s how the components are connected:
After doing exhaustive research, it seemed like the Pioneer DEH-80PRS was the only head unit that met all of my technical requirements:
- Rear RCA auxiliary input to allow factory stereo integration.
- 3 volt RCA outputs.
- RCA output for front/rear/sub speakers.
- Ability to play wav files (uncompressed lossless audio files) from USB and SD card slot.
- Good reviews on audio output quality.
I didn’t put a lot of research into the amp, just made sure that the front and rear speakers were powered by a class a/b amplifier. I liked the fact it used a class d amplifier for the sub because of its efficiency. I’ve always liked Rockford Amps and owned three prior to this. I was disappointed that they are no longer made in the USA, but couldn’t find any others that were. Here’s the general setup of the amp:
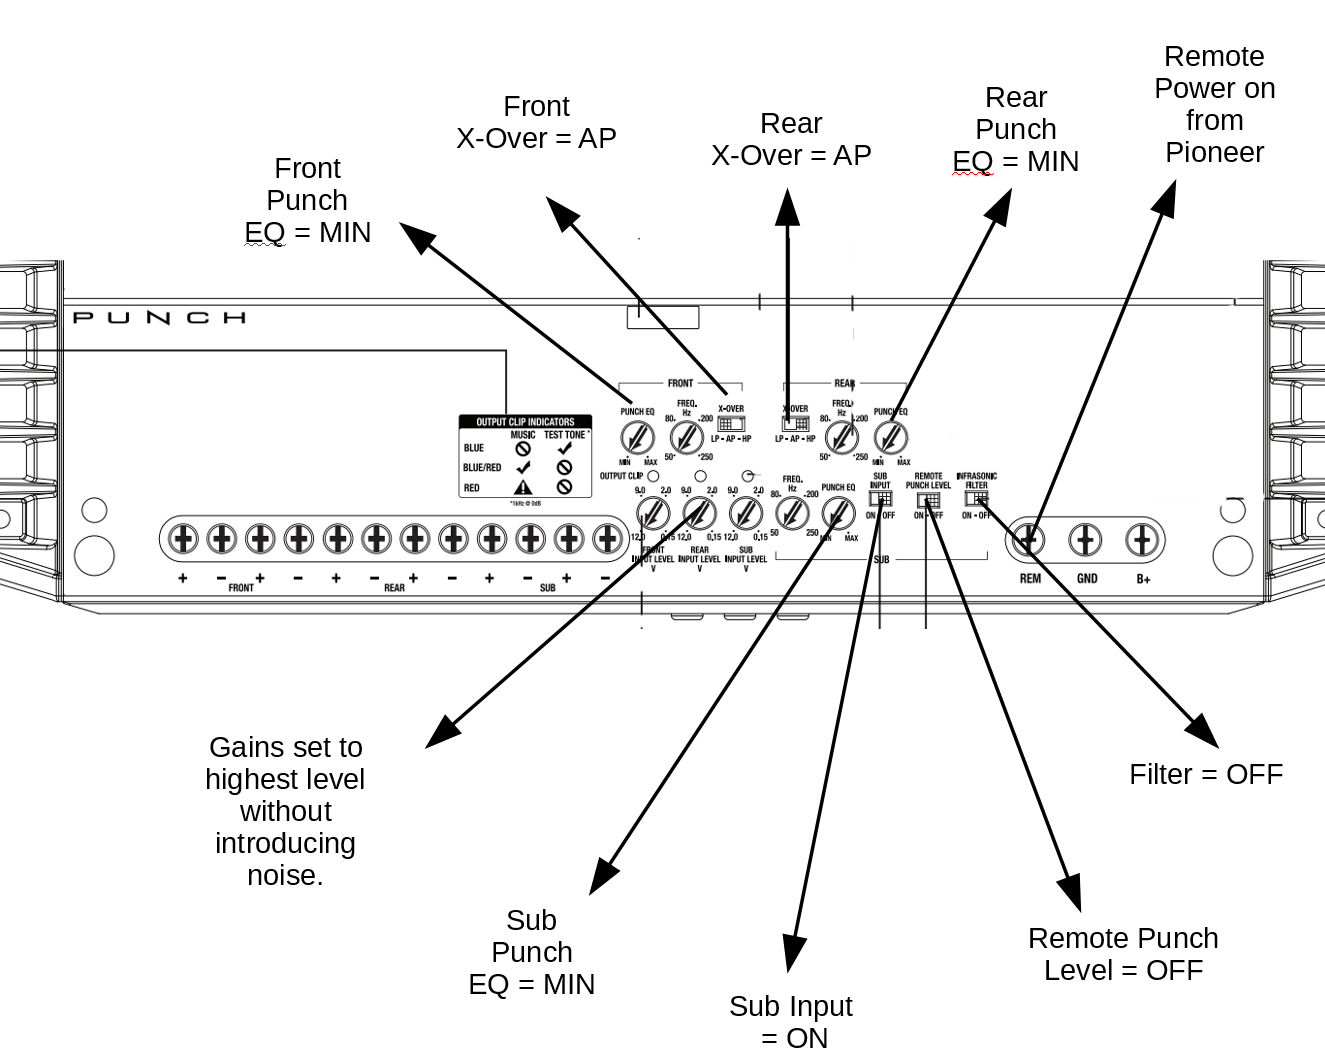
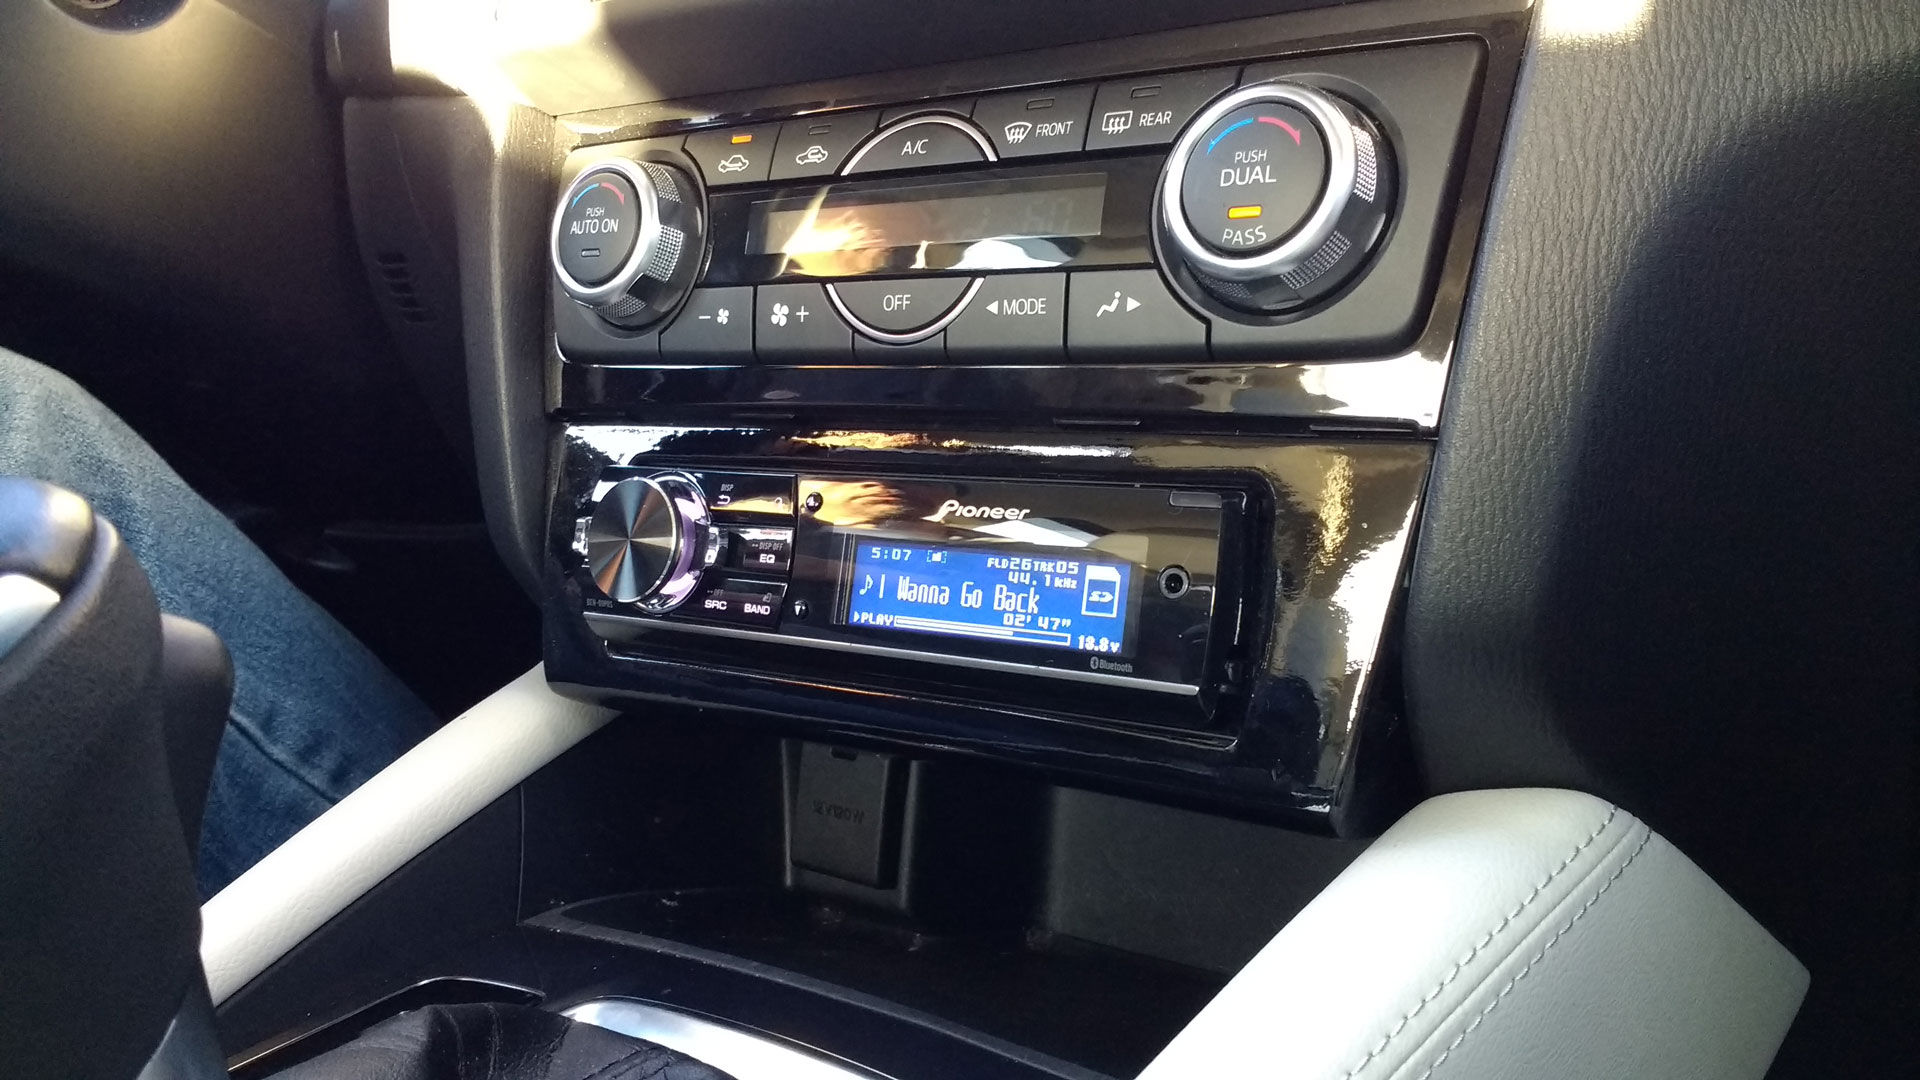
Early on, I noticed that the factory CD unit was about the size of a standard single DIN car stereo. I did a bit of research and didn’t find anyone who had done a replacement in the past. Here’s where a good stereo store comes in handy. Tony at Capital Stereo agreed to take the CD unit out and investigate the available area. He also had connections with individuals who could produce a custom molding that matched the interior of the vehicle. After his installers removed the CD player and verified that all other factory components continued to work, he proceeded to order the Pioneer deck. The final install went well and I’ve been using it for over a year without a single problem!
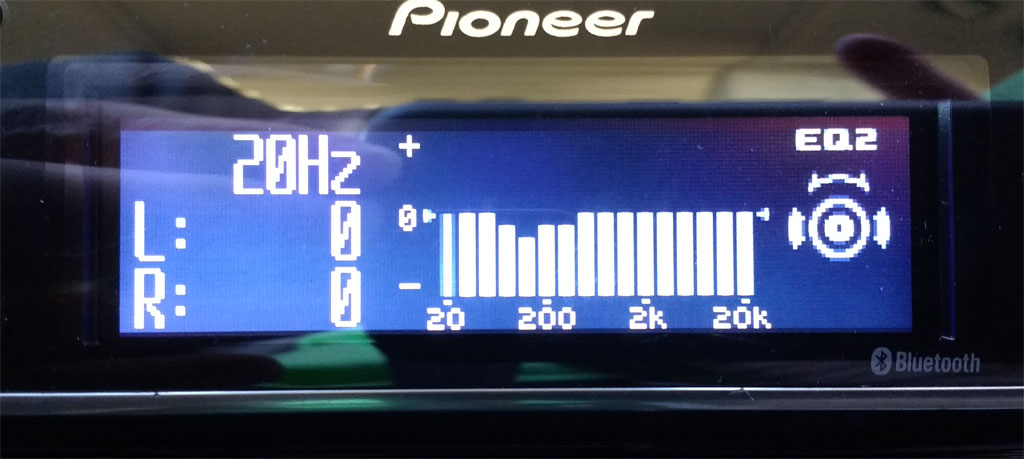
The deck has significant sound customization. I’ve left audio alignment off and tuned the equalizer manually. In all previous car stereos, I’ve never turned those knobs, but with this car and setup, the midrange with the default settings were booming and I had to quiet them down a bit:
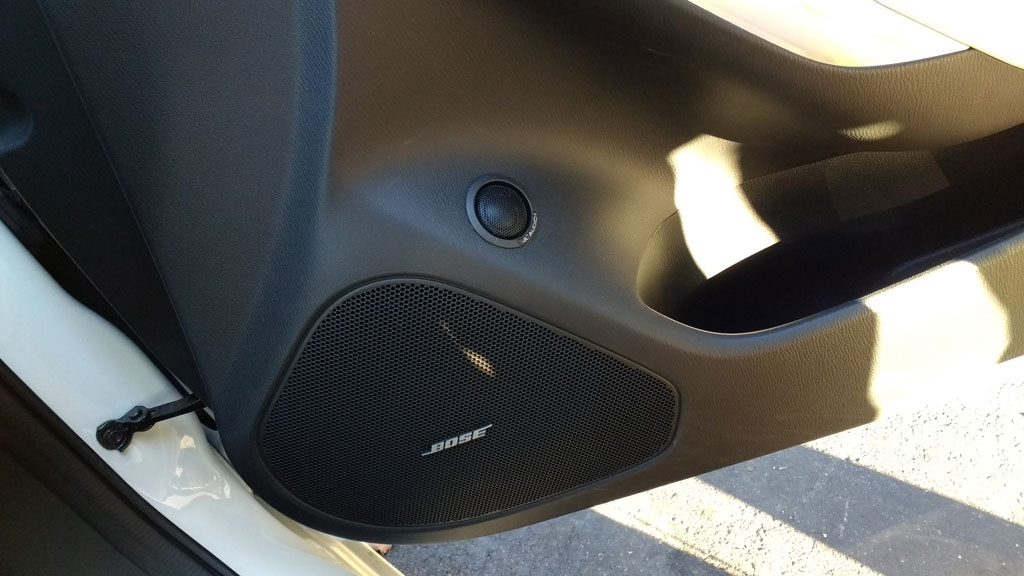
During the first install, I had the front speakers placed in the factory location – tweeters in the dashboard right under the windshield and woofers in the door. That turned out to be a horrible setup – with the tweeters so far away from the woofers; the sound seemed disjointed and did not produce any discernible stereo imaging. It’s possible that a three-way system might have worked better – with tweeter and midrange both located in the dashboard, but without a functioning center channel, I don’t think that would have made much of an improvement. The final placement of the tweeters that provided clear concise sound with full stereo imaging was to move the tweeters into the doors.
In the rear the tweeters are located in the rear deck and the woofers are in the doors. Again, this is less than ideal and sounds horrible for those sitting in back. From the front passenger perspective, it doesn’t matter much since the sound setup is correctly faded so that the front speakers are favored, leaving the rear only for fill. The best location for the rear woofers would be in the rear deck which would require custom modifications since the factory doesn’t leave room for them. A three-way setup with tweeters and midrange in the rear deck probably would have been OK, but very costly to address at this time.
The subwoofer is located in the trunk. I went with a truck’s compact sub size because I wanted to keep a spacious trunk and wasn’t ready to do a full custom sub enclosure. That might be something I do in the future, but it performs adequately. The only deficiency in the subwoofer system is its performance between 20 and 29hz where there is a noticeable drop off. My guess is that it’s the amp and not the subwoofer but I don’t have any way to find out. All in all, it’s just fine the way it is.
Conclusion and Future.
I have two potential projects in the future. First, I would like to experiment with the outputs from the head unit to the amp to determine if they are actually line out. If so, I could get rid of the AudioControl device (and smash it with a hammer) and plug the head unit directly into the Pioneer rear aux inputs. Second, move the woofers from the rear doors and place into the rear deck. That would complete the rear soundstage.
In conclusion, it took a lot of work to replace the factory system, but in every way it was worth it. I love the way it sounds and I’ll keep enjoying it far into the future.